
| Home | » | ASP | » | Communicating with the User |
In Early days only Static Pages are Created which never accept information from user but now today's days Web is Dynamic Means For Perfoming Any Task First user have to Specify Some Information to Web Page So Asp Server Will Communicate with User input Which is to be Supplied For Execution and Server Will Process Information That was Entered by current Visitor So Asp Provides Form For Collecting information From Users.
Contents
- What Are Forms?
- Designing Forms
- Submitting Forms?
- Reading Form Values from An ASP Page
- Using the Different Form Fields
What Are Forms?
We know that internet is based on client server model When a Client Makes a Request For a Web Page From Server , Server First Process the Requested Information and then this will send simple html Results to user So that Forms are used for Collecting the Information from user Forms Provides various Elements For Accepting information From User Like Textbox, Button, Radio, TextArea, Password etc.
Creating Forms
Creating a form is straightforward and simple. It requires as little as two lines of HTML as shown below :
Example: A Form is Created Using the <FORM> Tag
The above lines uses the HTML tag <FORM> to create a simple form. The <FORM> tag has two properties : METHOD and ACTION.
Name: Name Property Specify name of Form The Information is Send Through Form So For This Name Property of Each Element will be used That will Describe Which Information of Which Element is to be used by Server, Server will Always Use name of Element For Receiving Information From Client.
Action: This Property describe or Uses name of File Where the Information is to be Sent by Client it Contains Name of ASP File That will Accept Information that is Sent by Client.
Method: This Property Determines Method Either Information will be Posted or Get by Server . Method Property uses Generally types of Methods like Post or Get if a user uses post Method For Sending user information then all the information is Received by using Request.Form Method and if user uses Get Method for Sending information then Request.QueryString Method Will be Used For Receiving Information.
Designing Forms
When creating froms, keep a couple of things in mind. First, make sure that the form has a submit button. Second, it is important that the form be easy for the user to complete. A simple Form is design below Which have just UserName, Password and Submit Button.
Example: A Simple Form
Output
|
UserName: Password: |
Submitting Forms?
Using a standard Web browser, a user can surf to a Web page with a form on it and enter information. When the user does this, the information he is typing in has not yet been sent to Web server. This information is not available for, the Web server to process until the user submits the form by clicking the form's submit button.
It would be nice to be able to send this information to an ASP page, which could then determine what the user entered into the form and act on that information. The <FORM> tag offers two properties that allow you to send form information to an ASP page for processing: the ACTION property and the METHOD property.
Using the ACTION Property
The ACTION property of a form can be set to any valid URL. When a user submits the form, the URL specified in the ACTION property is called, and the values in the form fields are passed.
The second property of the <FORM> tag is called METHOD and can be set to either GET or POST. The METHOD determines how the form field values are passed to the ASP page specified in the form's ACTION property.
The Difference Between GET and POST
There are, not surprisingly, two ways through which information can be passed from a form to an ASP page. The first method uses the querystring and is the method used when a form's METHOD property is set to GET. The other method, POST, hides the user's information by not using the querystring.
The querystring is made up of name/value pairs, in the following form:
VariableName = ValueOfVariable
For example, if a URL were to appear as
http://www.yourserver.com/someFile.asp?name=Laura
the querystring would be
?name=Laura
Note that the start of the querystring is denoted by a question mark (?).
The querystring can contain multiple name/value pairs. When more than one name/value pairs is in the querystring, each name/value pair is separated by a ampersand (&). For example, if both the name and age were stroed in the querystring, the querystring might look like this:
?name=Laura&age=26
In below Example, you'll find a simple form that has its METHOD property set to GET. This form doesn't really do anything complex; it simply demostrates how form values can be passed through the querystring.
Example: Creating a Form Where METHOD=GET
Demo - Submitting Form Using METHOD=GET
Reading Form Values from An ASP Page
Now that you know how to send form field values to an ASP page, you may find yourself wondering how to read form field values in your ASP pages. You read form field values by using the Request Object. The Request object contains two collections used to read form data.
- QueryString Collection-The QueryString collection is used to access the name/value pairs passed through the querysting.
- Form Collection-The Form collection is used to access the name/value pairs passed by a form thta has its METHOD property set to POST
Let's start by creating the page that will have the form on it. For this example, we'll create a form that asks for the user's name and date of birth.
| The HTML code for "BirthdateForm.html" |
Output of "BirthdateForm.html" |
| The code for "BirthdateForm.asp" |
Output of "BirthdateForm.asp"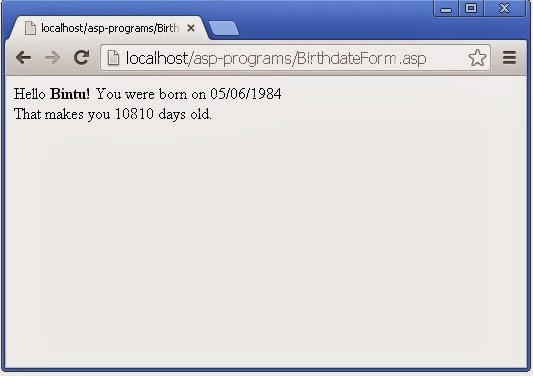 |
Demo - BirthdateForm
Using the Different Form Fields
There are Many Form Fields those can be used for Designing Forms those are Specified in input tag with type Attributes of Input tag those are as follows like:
| <FORM>...</FORM> | Form: Defines the beginning and end of a form. |
| <FORM> Attributes | |
| ACTION="script" | Action: This attribute specifies the URL of the script used to handle data sent by visiting web browsers from a specific form. |
| METHOD=post, get | Method: This attribute specifies how the input from the form will be sent to the server side gateway. The most common method is "post." |
| <INPUT>...</INPUT> | Input: The input field tag |
| <INPUT> Attributes | |
|
TYPE • Text • Radio • Checkbox • Select • Submit • Reset |
The type attribute specifies the type of field displayed. See the Input Types List below for an explanation of each input type. |
| NAME | name="name" The name attribute tells you what the field is called. If action of the form is to mail you the text entered by the user the "name" will appear next to the contents entered by the user. |
| SIZE | size="number" The number defines the length of the text field. |
| <TEXTAREA>... </TEXTAREA> |
Text Area: This displays a scrolling text box on the page, in which a visitor may enter one or more lines of information. |
| <TEXTAREA> Attributes | |
| ROWS | Specifies the height of the text box, in rows. |
| COLUMNS | Specifies the width of the text box, in columns. |
| Input Types List | |
| TEXT | Text displays a standard text field in the form. name="name" Describes the field. If action of the form is to mail you the text entered by the user the "name" will appear next to the contents entered by the user. size="number" The number defines the length of the text field. |
| RADIO | A radio button lets a visitor select one and only one of a set of options. name="category" Describes the set of radio buttons. value="button option" The data that sent to the server if a visitor selects that radio button . Example: If a visitor selects the radio button with the value "MR." from a set of radio buttons with the name "HONORIFIC", then the web browser will send "HONORIFIC= MR" to the web server. |
| CHECKBOX | A checkbox lets a visitor select one or more options from a set of options. name="category" Describes the set of checkboxes. value="button option" The data that sent to the server if a visitor selects that checkbox . Example: If a visitor selects the checkbox with the value "MR." from a set of checkboxes with the name "HONORIFIC", then the web browser will send "HONORIFIC=MR" to the web server. |
| SELECT | This creates a list box, similar in appearance to a Windows '95 drop-down menu. name="name" The name of the list box. option ="items in the category" The options listed in the list box. |
| SUBMIT | Submit displays a single grey button that can be selected to submit the contents of the form. Value="words on button" Optional: If used, allows you to customize the button label. |
| RESET | Reset displays a single grey button that can be selected to clear the contents of the form. Value="words on button" Optional: If used, allows you to customize the button label. |
Example
Output

Blogger Comment
Facebook Comment